
Learning to adjust your video lighting can be a daunting task, especially when you’re a newbie. Still, if you’re serious about creating high-quality video content, it’s something that you’ll need to master as soon as possible. Without proper lighting, your recordings simply won’t look good.
In this short guide, we’ll provide you with a couple of tips and tricks to help you improve video light for your videography, so keep on reading to learn more about it!
Without any further ado, let’s get right to the bottom of it.
1. Take Advantage of Natural Light

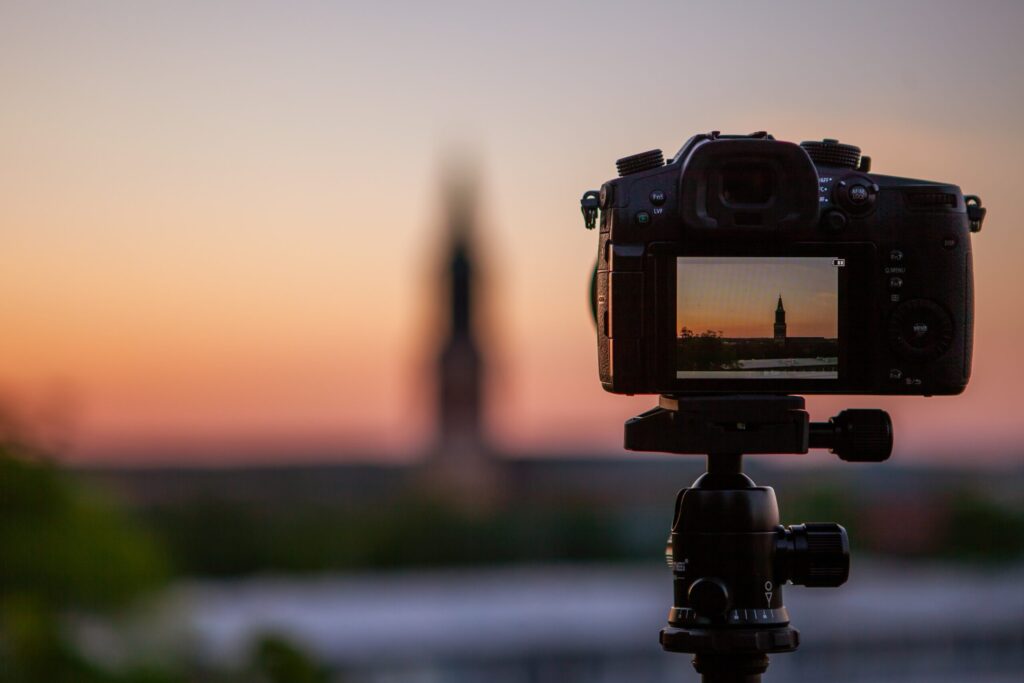
The best video light is sunlight – nothing can come close to it. Mother nature truly never disappoints: natural light will always beat artificial illumination in every possible way.
So, try filming your videos during the day and keep all of those windows open if you’re filming indoors. This type of setting is perfect for portraits, as it evens out the skin and makes the eyes shine.
If you’re producing your video content using your phone’s camera, then the quality of your recording is probably quite limited. In those cases, natural light may be your only saving grace, especially if you’re trying to make your videos look professional.
Either way, don’t neglect the potential of the most powerful light source available on our planet – the Sun! It’s powerful, cost-effective, and easily accessible: all you have to do is to take your camera outside! Play around with shadows and positioning until you find something that suits your needs and your style.
2. Keep That Light in Front of You, Not Behind You!
Most amateur cameras utilize auto-exposure technology, which means they’ll focus on your light source if it’s positioned inadequately. Be careful with your backlight – keep the source in front whatever’s the main focus of your video, not behind it. As we’ve already mentioned before, your video camera light is a tool that should help you film better videos, not an obstacle you need to overcome. Don’t be afraid to experiment – it’s the best way to find „optimal“ lighting for your videography.
Either way, knowing where to place the light source is incredibly important. This especially goes for video conference lighting, as you don’t want to be „overshadowed“ by the light source itself.
Of course, as we’ve already mentioned before, there’s nothing wrong with experimenting – try different positions until you’ve found something that suits your video goals. Be creative and don’t be afraid of breaking some norms!
3. As Much as You Want to, Don’t Mix Different Lighting
So, you’ve purchased some cool LED video lights that you’d like to show off in your recording? Make sure you take it one at a time! Cold and warm tones simply won’t do any good to your camera’s lenses, as it will need too much time to adjust to the contrast between them. Stick to a single light source whenever possible, especially if you’re not working with a professional camera.
As we’ve already mentioned before, finding good light for video recording is not an easy task. You’ll need to fight the urge to mix different types of lighting in your video in order to get the best possible results.
Even though we don’t recommend mixing different lighting in your videos, we’re not saying it’s something strictly forbidden. It can get a bit overwhelming for a beginner, so it’s better to avoid it. However, if you’d like to give it a try, we aren’t stopping you. Perhaps you can find the right balance of colors, tones, and brightness levels that will work perfectly for your video – experimentation is your best friend!
4. Invest in a Quality Light Source
Natural light isn’t available everywhere and at all times, so in some cases, artificial lighting might be your only option. If so, make sure you invest in quality studio lights for your videography. Poor lighting can affect your videos’ quality in a major way – it’s best avoided by purchasing your lights from reliable suppliers. For example, COLBOR offers LED video lights for studio and home recording that is worth checking out.
Either way, buying your video lights from trustworthy suppliers is of the utmost importance. We recommend opting for LED lights as they’re the most versatile. Search the internet for reviews and ratings until you’ve found a brand that seems worth your attention. Don’t forget to compare different vendors to save some money as well – professional studio lighting can be a bit pricey after all.
Again, if you’re able to use natural light for your recordings, don’t hesitate to do so. Otherwise, have a couple of LED lights ready as a replacement. As long as they’re of good quality, your video content will improve.
5. Choose the Bulb Color as Carefully as Possible
Video lights can set a tone for the entire video recording – they’re able to tell a story. For example, go for cooler lights if you want to convey a gloomy atmosphere to the viewer. Blue LED lights are an excellent choice in this particular scenario. Warmer lights, on the other hand, work better when you’re trying to set a „cozy“ tone to your recording.
Again, whatever you do, avoid mixing different colors. This is not only confusing for the viewer, but it also confuses your camera, in turn lowering the quality of your video.
Overall, the color you choose will mostly depend on the nature of your recording. Put some thought into it! You can find LED lightbulbs of almost any color nowadays, so there’s almost no limit to what you can create.
The Bottom Line
All in all, choosing and adjusting the light for your videography can get a bit overwhelming pretty quickly. Make sure you do your research and seek professional advice where you deem it necessary – at least until you’ve developed some skills as a videographer.
Either way, we hope you found our tips to be useful and we wish you the best of luck in all of your future endeavors.


